By Drew Cutchins - 5 August 2018
Today I want to make some noise functions.
These functions will all follow two rules:
First we need a way to visualize these functions. Noise functions are often visualized as greyscale images because they are a concise way of visualizing the relationship between the input, the coordinants of the pixel, and the output, the darkness of the pixel. I will be writing all code in javascript so that I can easily provide interactive examples, but the priciples can be carried over into the programming language of your choice. Our visualizer will be an html5 canvas, we will be using the function below to pass in an array of values between 0 and 1, and populate the pixels of the canvas with their respective values.
// Aquire the data of the canvas, so that we can assign to it in our UpdateCanvas function
var canvas = document.getElementById('Canvas');
var context = canvas.getContext('2d');
var imageData = context.getImageData(0, 0, canvas.width, canvas.height);
var data = imageData.data;

// pixels should be an array of arrays with a length of 3 (For the three color channels)
function UpdateCanvas(pixels){
    for (var y = 0; y < canvas.height; y++) {
        for (var x = 0; x < canvas.width; x++) {
            var index = (y * canvas.width + x) * 4;
            for(var channel = 0; channel < 4; channel++){
                data[index + channel]  = pixels[index/4][channel];
            }
        }
    }
    context.putImageData(imageData, 0, 0);
}

function ValueToPixel(value){
    // red, green, blue, alpha
    return [value*255, value*255, value*255, 255];
}
Lets test our Update Canvas Method by inputting an array of values set by a sider.
// The slider provides a value between 500 and 990
var valueSlider = document.getElementById('ConstantValueSlider');
function loop(){
    // An array of values between 0 and 1
    values = []
    for (var y = 0; y < canvas.height; y++) {
        for (var x = 0; x < canvas.width; x++) {
            // valueSlider will give a value between 0 and 100
            values[x + y * canvas.width] = valueSlider.value / 100.0;
        }
    }

    // Converts the array to pixel values with red, green, blue, and alpha channels
    valuesAsPixels = values.map(x => ValueToPixel(x));

    UpdateCanvas(valuesAsPixels);
}
Value:
The easiest noise function to create will be a white noise function. White noise is a series of unrelated values within a defined variance. In other words, two different inputs, no matter how close they are, will produce randomly different outputs. Our defined variance will be 0 and 1.
It might be tempting to create a function like the following to generate white noise:
function WhiteNoise(width, height){
    var values = [];
    var length = width * height;

    // Assign each indicie in the array a random value between 0.0 and 1.0
    for(var i = 0; i < length; i++){
        values[i] = Math.Random();
    }

    return values;
}
While this code does indeed produce white noise, it breaks the second rule I defined at the beginning of the article. Watch below as we run the function repeatedly:
// The slider provides a value between 500 and 990
var FrequencySlider = document.getElementById('DynamicStaticUpdateFrequency');
function loop(){
    whiteNoiseValues = WhiteNoise(canvas.width, canvas.height);
    // Converts the array to pixel values with red, green, blue, and alpha channels
    var valuesAsPixels = whiteNoiseValues.map(x => ValueToPixel(x));
    UpdateCanvas(valuesAsPixels);

    // The display is refreshed every 1000 minus the value of the frequency slider milliseconds
    setTimeout(loop, 1000 - FrequencySlider.value);
}
Update Frequency:
Everytime we run this function, we get different results. This is because of how random number generators work. Random number generation is far beyond the scope of this post, but it is important to note that random number generators have an internal state. The internal state is manipulated during each call to the random number generator and is then used in subsequent generations. For our purposes, we would like to create a random number function that is free of an internal state, and instead takes an x and a y value as its “state”. I adapted a simple hash function from a stack overflow post to suit my needs. Note the use of a seed. Changing this seed will change the output of the function and will allow for different generations given the same coordinants.
seed = 0
// This function will return a "random" number given two coords
function randomFromCoords(x, y){
    var h = seed + x*374761393 + y*668265263; // all constants are prime
    h = (h^(h >> 13))*1274126177;

    // The hash calculates a value between 0 and 2147483647 (The maximum value of a 32 bit integer).
    // This value is then divided by 2147483647 so that we can return a value between 0 and 1.
    return (h^(h >> 16)) / 2147483647.0;
}
Using this function we can revise our white noise to produce the following <!–
function WhiteNoise2(width, height){
    var values = [];
    seed = 20;
    for (var y = 0; y < height; ++y) {
        for (var x = 0; x < width; ++x) {
                values[x + y * width] = randomFromCoords(x,y);
        }
    }
    return values;
}
And by tweaking our original update loop to use our new function we produce the following
// The slider provides a value between 500 and 990
var FrequencySlider = document.getElementById('StaticWhiteNoiseLoopDisplayCanvas');
function loop(){
    whiteNoiseValues = WhiteNoise2(canvas.width, canvas.height);
    // Converts the array to pixel values with red, green, blue, and alpha channels
    var valuesAsPixels = whiteNoiseValues.map(x => ValueToPixel(x));
    UpdateCanvas(valuesAsPixels);

    // The display is refreshed every 1000 minus the value of the frequency slider milliseconds
    setTimeout(loop, 1000 - FrequencySlider.value);
}
–>
Update Frequency:
Viola! Our first noise function.
Now, before we move on to our next function, I would quickly like to show you how to scale our noise function, as this will come into play later as we built more complex functions.
As of now, our noise function operates at a 1:1 scale between pixels and samples. However, we can change this so that we can “zoom” in on our noise function, giving us a closer look at the generated values. We only need to modify our code slightly to allow for the user to change the scale of the noise.
function WhiteNoise(width, height, scale){
    var values = [];
    seed = 20;
    for (var y = 0; y < height; y++) {
        for (var x = 0; x < width; x++) {
                // The x and the y values are divided by the scale, then floored.
                // This is equivalent of integer division.
                scaledX = Math.floor(x / scale);
                scaledY = Math.floor(y / scale);
                // Note the usage of randomFroomCoords over Math.random
                values[x + y * width] = randomFromCoords(scaledX,scaledY);
        }
    }
    return values;
}
Scale:
However, unless we are generating a texture for a static television, we don’t have much use for white noise.
What is more useful is coherent noise. Coherent noise is defined as noise that will exhibit a small change given a small change in input, and will exhibit a random change given a big change in input. For example, if we provided our noise function with the value “3” it might return a value like “.3” and if we provided “3.1” it might return “.29”. In other words, it is safe to assume that if two input values are close, their corresponding output values will be close. This allows for us to make textures resembling things like clouds, fire, or what I find most interesting: heightmaps.
Our first coherent noise function will be perlin noise.
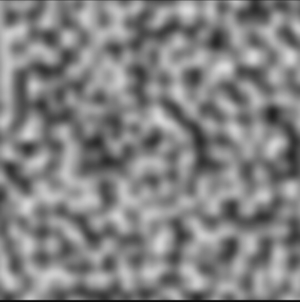
Perlin noise (as pictured above) consists of many sub-gradients. These sub-gradients are represented by a grid of vectors (as pictured below).
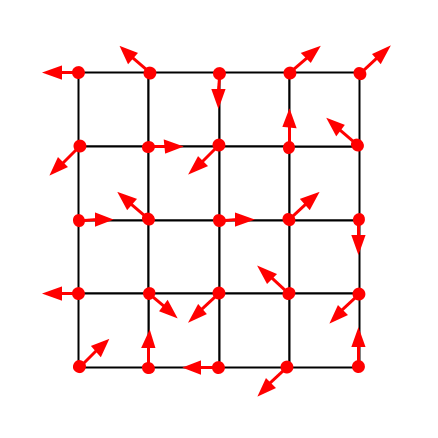
In perlin noise, the field is divided into a grid. Each grid cell has a vector at each corner that defines a gradient. When a point is sampled, its respective grid cell is calculated. Next for each corner of the cell, the dot product of the vector from the corner to the point and the corner’s gradient vector is calculated. The average of these four values is the value of the point.
First we need a way to determine gradient vectors for each subdivision of the field. Let’s create a table of 8 vectors, representing the 8 cardinal and intercardinal directions.
var vectors = [[1,0],[1,1],[0,1],[-1,1],[-1,0],[-1,-1],[1,-1]]
Next, lets create a function to determine the cell of the sampled point. We will use a parameter, scale, to indicate the size of the cell.
function pointToCell(x, y){
    cellX = Math.floor(x);
    cellY = Math.floor(y);
    return {x:cellX, y:cellY};
}
We also need a way to determine the four gradient vectors of the cell. For this we’ll need to generate a random number given an input coordinant. You might now ask “Isn’t that exactly what our white noise function did?” To which I would respond, “Yes.” So lets use our “randomFromCoords” function to generate vectors for our grid cell.
function cellToVectors(cellX, cellY){
    halfCell = .5;
    // I use the four intercardinal directions to label the vectors.
    // The random values are multiplied by 8 to map them to the 8 entries of the vectors array.
    NEvector = vectors[Math.floor(randomFromCoords(cellX + halfCell, cellY + halfCell))*8];
    SEvector = vectors[Math.floor(randomFromCoords(cellX + halfCell, cellY - halfCell))*8];
    SWvector = vectors[Math.floor(randomFromCoords(cellX - halfCell, cellY - halfCell))*8];
    NWvector = vectors[Math.floor(randomFromCoords(cellX - halfCell, cellY + halfCell))*8];
    return {NE: NEvector, SE: SEvector, SW: SWvector, NW: NWvector};
}
For our next step, a dot product calculation, we need to first create a dot product funtion. The dot product of two vectors is the magnitude of each vector multiplied by the cosine of the angle between the vectors. When the two vectors are pointed in oposite directions, the dot product will be zero.
// each vector is assumed to have an x and a y property
function dotProduct(vector1, vector2){
    // Another way to calculate the dot product. This is more performance friendly than cosine calculations.
    return vector1.x * vector2.x + vector1.y * vector2.y;
}
And last but not least, we a function to determine a weighted average between values. This will be used when averaging between the four dot products. The method we are using is known as linear interpolation.
// linear interpolation, "lerp" for short.
function lerp(value1, value2, t){
    return (1 - t) * value1 + t * value2;
}
Now we can create our perlin noise function!
function perlin(x, y){
    var cellCoord = pointToCell(x, y);

    // Get the positions of the x and y coordinants relative to the cell
    var Xoffset = x - cellCoord.x;
    var Yoffset = y - cellCoord.y;

    var vectors = cellToVectors(cellCoord.x, cellCoord.y);

    // The offset from each corner is calculated.
    // Then the dotproduct between the offset vector and the random vector is calculated.
    var NEoffset = {x: Xoffset - 1, y: Yoffset - 1};
    var NEdotProduct = dotProduct(NEoffset, vectors.NE);

    var SEoffset = {x: Xoffset - 1, y: Yoffset};
    var SEdotProduct = dotProduct(SEoffset, vectors.SE);

    var SWoffset = {x: Xoffset, y: Yoffset};
    var SWdotProduct = dotProduct(SWoffset, vectors.SW);

    var NWoffset = {x: Xoffset, y: Yoffset - 1};
    var NWdotProduct = dotProduct(NWoffset, vectors.NW);

    var Nlerp = lerp(NWdotProduct, NEdotProduct, Xoffset);

    var Slerp = lerp(SWdotProduct, SEdotProduct, Xoffset);

    var finalValue = lerp(Slerp, Nlerp, Yoffset);

    return finalValue;
}
And by plugging this function back in to our value generator,
function perlinNoise(width, height){
    var values = [];
    seed = 20;
    for (var y = 0; y < height; y++) {
        for (var x = 0; x < width; x++) {
            // The number x and y are divided by is the size of the cell
            values[x + y * width] = perlin(x/30,y/30);
        }
    }
    return values;
}
We create the following:
Wait, that doesn’t look like the picture! There’s actually one last function we need to add to our perlin noise generation. As of now, the four corresponding dot products of a point are interpolated between linearly, however, this does not create a smooth transition between squares. Instead we want to interpolate using a quartic function devised by Ken Perlin himself (shown below).
\[6t^5 - 15t^4 + 10t^3\]In code we write this as:
fade: function(t){
    return t * t * t * (t * (t * 6 - 15) + 10);
}
So now if we change our calls to lerp to now apply the fade functions to the offsets,
function perlin(x, y){
    // ...

    var Nlerp = this.lerp(NWdotProduct, NEdotProduct, fade(Xoffset));

    var Slerp = this.lerp(SWdotProduct, SEdotProduct, fade(Xoffset));

    var finalValue = this.lerp(Slerp, Nlerp, fade(Yoffset));

    // ...
}
We produce the following:
We did it! Now, before we wrap up, let’s add a couple more features to our noise generator.
First, let’s implement scaling functionality, like we did with our white noise. By changing the constant that our x and y values are divided by, we can change the scale of the perlin noise.
function perlinNoise(width, height, scale){
    var values = [];
    seed = 20;
    for (var y = 0; y < height; y++) {
        for (var x = 0; x < width; x++) {
            // The number x and y are divided by the scale parameter
            values[x + y * width] = perlin(x/scale,y/scale);
        }
    }
    return values;
}
Scale:
Now that we have a method of scaling our noise, we can layer multiple noise functions on top of each other to create something known as fractal noise (pictured below).
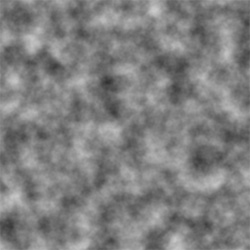
Fractal noise is created by adding together multiple noise functions. Typically, each added noise will have a greater frequency and smaller amplitude. In other words, the first function will define the general layout of the output, but the later functions will dictate the details.
Fractal noise is generated with two parameters, the number of octaves, and the persistence. The number of octaves is simply the number of noise functions used in creating the final output. The persistence is a value that dictates the rate at which the amplitude of successive noise iterations decreases.
\[A = p^n\]The amplitude is equal to the persistence, a number between 0 and 1, raised to the number of the current iteration. Frequency is often set to equal $2^n$.
With these formulae in mind, we can construct our fractal noise function.
function fractalNoise(width, height, scale, octaves, persistence){
    var values = [];
    seed = 20;
    for (var y = 0; y < height; ++y) {
        for (var x = 0; x < width; ++x) {
            var value = 0;
            // For each octave...
            for(var n = 0; n < octaves; n++){
                // A = p^n
                var amplitude = Math.pow(persistence, n);

                // F = 2^n
                var frequency = Math.pow(2, n);

                // Add each noise value to the total value of that pixel
                value += perlin((x/scale) * frequency, (y/scale) * frequency) * amplitude;
            }
            values[x + y * width] = value;
        }
    }
    return values;
}
Scale:
Octaves:
Persistence:
Note that sampling a point in fractal noise takes $O(n)$ time where n is the number of octaves. Increasing the number of octaves will decrease the performance of the noise function.
Thats all for today, I hope you had fun and maybe learned a thing or two about generating noise with code. If you have any comments, corrections, or suggestions for articles in the future please leave them in the comment section below.